Imagine you are writing an important email and reach the halfway point, but now you can not brainstorm ideas anyfurther. This is the moment when you need to take a pause to refresh, collect ideas, analyze data, and come up with something effective. However, in the middle, you do not know how to schedule an email in Outlook to complete your email and send it at the right moment. Do not worry, we have got you covered. The users sometimes are not familiar with all the features of the new Outlook.
In this comprehensive and easy-to-follow guide, you will learn instantly how to schedule your emails in the new Outlook with a few steps. With just a little effort, now you can write your emails perfectly and send bulk emails at the right time of the day.
What Does It Mean to Schedule an Email in Outlook?
Scheduling an email means you write the message now, but Outlook sends it later at the time you pick.
This is useful in many daily cases. At night, you may finish an email, but you may not want to send it then. By the next morning, you may need a follow-up to go out. Before a class, a meeting, or a call, you may want a reminder to arrive. With this feature, you can prepare the email early, use Outlook email templates for repeat messages, and let Outlook send it at the planned time.
For many people, this feature helps in simple ways:
- Send emails in work hours
- Avoid sending emails late at night.
- Prepare messages early
- Plan follow-ups before time
- Match another person’s time zone
- Keep your email routine more neat.
Another good point is peace of mind. After the email is ready, you do not need to remember it again. Instead, Outlook holds the plan for you.
Before You Start
First, check which Outlook version you use.
This small step matters a lot because the steps change with each version. New Outlook for Windows uses one-way. Outlook on the web uses almost the same way. Classic Outlook for Windows uses another setting. Outlook for Mac also has its own method.
Here are the main differences:
- New Outlook for Windows uses Schedule Send
- Outlook on the web also uses Schedule Send
- Classic Outlook for Windows uses Do not deliver before
- Outlook for Mac uses Schedule Send.
- In the new Outlook, the feature is not available for some account types, such as IMAP or POP.
- In classic Outlook, Outlook must stay online and connected for delayed delivery.
- On Outlook for Mac, scheduled send needs an Exchange account and does not work with IMAP or POP accounts such as Gmail, Yahoo, or iCloud.
Because of these differences, users often get confused. At times, they read a guide, but their Outlook screen is not the same. So, before you do anything else, check the version first. That one check can save you time.
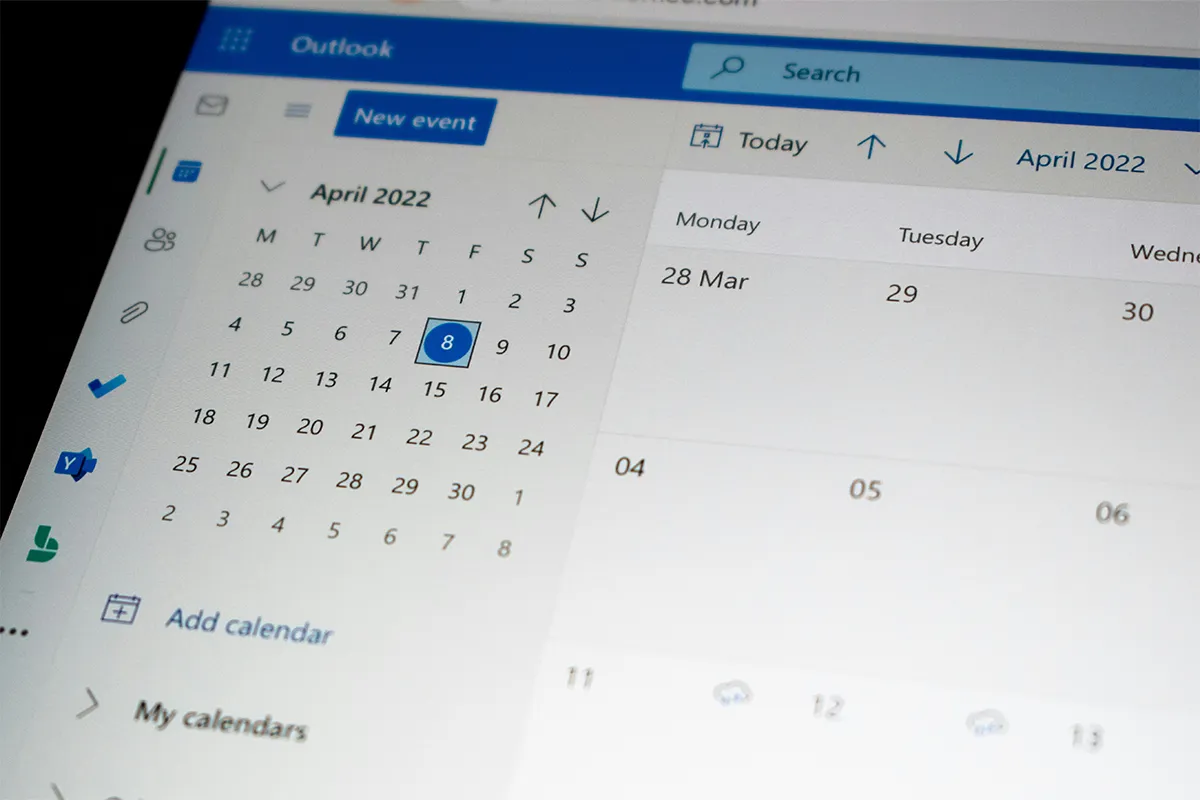
How to Schedule an Email in New Outlook for Windows
New Outlook for Windows gives a simple method for this task.
Steps:
- Open a new email.
- Write the subject and message.
- Click the arrow next to Send.
- Choose Schedule send.
- Pick one suggested time, or choose your own date and time.
- Click Send.
After that, the message stays in the Drafts folder until you select it.
For many users, this version feels easy because the option is clear once you know where it is. The path is short, and the steps are not difficult.
How to Send It Right Away Instead
Sometimes the plan changes. Maybe you scheduled the email, but now you want to send it all at once. That is possible too.
Use these steps:
- Go to the Drafts folder
- Open the scheduled email.
- Click the Edit pencil icon.
- Choose Send Now
This means the feature is flexible. Later, you can still change the decision even if you planned early.
How to Schedule an Email in Outlook on the Web
Outlook on the web works almost like the new Outlook for Windows. That is helpful because the process stays simple.
Steps:
- Open Outlook on the web.
- Start a new email.
- Write the message.
- Click the arrow next to Send.
- Choose Schedule send
- Pick a suggested time or set your own time.
- Click Send
Then the email stays in the Drafts folder until the scheduled time.
For browser users, this method is often very easy. The layout is clean, and the feature is simple to use after you see it once.
If You Need to Cancel or Send It Early
You can change the schedule here, too.
Use these steps:
- Open the Drafts folder
- Open the scheduled email.
- Click the Edit pencil icon.
- Choose Send Now
So, if your plan changes, the message is still under your control. You can send it early without making a new email from the start.
How to Schedule an Email in Classic Outlook for Windows
Classic Outlook for Windows uses a different way. You do not see a simple Schedule send button like in the newer versions. Instead, you set a delivery time inside the message options.
At first, this can look a little less simple. Still, the process is not too hard when you do it step by step.
Steps:
- Open a new email.
- Write the message.
- In the ribbon, open More options from the Tags group.
- Under Delivery options, check Do not deliver before.
- Choose the date and time.
- Click Close.
- Finish the email and click Send.
After this, the message stays in the Outbox until the chosen time.
This point is important because many users look in the wrong folder later. In classic Outlook, the message is usually not in Drafts. It is in the Outbox.
Important Note for Classic Outlook
One thing matters a lot here.
Classic Outlook must stay online and connected for this feature to work on time. If the computer is offline or Outlook is not connected well, the email may stay in the Outbox.
Because of this, some people think the feature did not work. But many times the setup was correct. The real problem was the connection at the sending time.
How to Send It Now Instead
If you want to remove the delay, you can do that.
Use these steps:
- Open the Outbox
- Open the delayed email.
- Open More options
- Clear the Do not deliver before box.
- Click Close
- Click Send again
Then the email goes without waiting for the old time.
How to Schedule an Email in Outlook for Mac
Outlook for Mac also gives this feature, but some account rules are important first.
Steps:
- Compose the email.
- Add at least one recipient.
- On the Send button, click the dropdown arrow.
- Select Schedule send.
- Enter the date and time.
- Click OK.
After that, the message stays in the Drafts folder until the selected time.
For Mac users, this is useful when they want to finish messages early and send them at a better time later.
Requirements for Mac
A few limits matter here:
- The feature is available in a Microsoft 365 subscription, Outlook 2019 for Mac, and Outlook 2021 for Mac
- It requires an Exchange account.
- It does not work with IMAP or POP accounts such as Gmail, Yahoo, or iCloud.
So, if the feature does not work on Mac, the account type may be the reason.
How to Cancel It on Mac
The cancel part is also simple.
- Open the email from Drafts.
- select Cancel Send
Then the email stays open. After that, you can edit it, send it now, or schedule it again for another time.
The Main Difference Many Guides Miss
Many blog posts show only one method. That is where the confusion starts.
A simple way to remember it is this:
- New Outlook and Outlook on the web usually keep the message in Drafts
- Classic Outlook for Windows keeps the message in the Outbox.
- Outlook for Mac keeps the message in Drafts.
This small detail is very helpful when you need to check the message, edit it, cancel it, send it early, or mark emails as read later.
A lot of users only need this one point to solve the problem. At first, they think the email is gone, but it is only in another folder.
Can You Delay All Emails in Outlook?
Yes, but this is mainly for classic Outlook for Windows.
In that version, you can make a rule that delays all outgoing emails for a set number of minutes. The delay can be up to 120 minutes. This rule gives you a small review window after you click Send.
This is useful for users who often send emails quickly and then notice a mistake after one or two minutes. With this rule, you get a little extra time to stop the message.
Still, this is not the same as choosing one exact future date and time for one email. That is why many users prefer the normal schedule option. It is more direct for one message and easier to manage for planned sending.
Common Problems and Easy Fixes
Problems can happen, but most of them are easy to understand.
1. You do not see the Schedule send option
A different Outlook version is often the reason. New Outlook and web Outlook show a Schedule send option. Classic Outlook uses a delivery setting instead.
So, if the guide looks right but your screen looks different, check the Outlook version first.
2. The email did not send at the planned time
Classic Outlook may be the reason. That version must stay online and connected. If it is not, the email can stay in the Outbox.
This is one of the most common problems with delayed sending in classic Outlook.
3. The account type does not support it
Some account types have limits. In the new Outlook, scheduled sending is not available for IMAP or POP accounts. On Mac, scheduled send needs Exchange and does not work with IMAP or POP accounts.
Because of this, the feature may not appear or may not work as expected.
4. You cannot find the scheduled email
Look in the correct folder:
- Drafts in new Outlook, web Outlook, and Mac
- Outbox in classic Outlook for Windows
This is a small fix, but it solves a very common problem.
Best Times to Use Scheduled Email
Scheduled email is simple, but it helps in many real situations, especially for Outlook business email.
You may want to use it when:
- Finish work late at night
- Want an email to arrive in the morning.
- You want to prepare reminders early.
- Work with people in another time zone.
- Want your emails to look more planned and professional.
In some Outlook experiences, you may also see send time suggestions when the other person is outside working hours. This can help you choose a better time.

In daily work, this feature is not only about tools. It is also about timing. A message sent at a better time can feel clearer, calmer, and more professional.
At a Glance: How to Schedule an Email in Outlook
| Outlook version | How to schedule | Where the email stays | Important limit or note | Best for |
|---|---|---|---|---|
| New Outlook for Windows | Click the arrow next to Send and choose Schedule send. | Drafts | Not available for IMAP or POP accounts. | Users who want the easiest built-in option |
| Outlook on the web / Outlook.com | Click the arrow next to Send and choose Schedule send. | Drafts | Works in the web interface with a simple flow. | Users who send mail in a browser |
| Classic Outlook for Windows | Open More options, then use Do not deliver before. | Outbox | Outlook must stay online and connected for delayed delivery. | Users who need more control in desktop Outlook |
| Outlook for Mac | Click the arrow on Send and choose Schedule send. | Drafts | Needs an Exchange account; does not work with IMAP or POP accounts like Gmail, Yahoo, or iCloud. | Mac users with supported work or school setups |
Quick decision note:
Choose new Outlook or Outlook on the web if you want the simplest steps. Choose classic Outlook if you use the older desktop app and need delay settings there. Choose Outlook for Mac only if your account setup supports scheduled send.
Conclusion
Learning how to schedule an email in Outlook becomes easier when you first know which Outlook version you use. That is the main point.
For new Outlook and Outlook on the web, look for Schedule send next to the Send button. In classic Outlook, use Do not deliver before in the message options. On Outlook for Mac, the feature works in supported Exchange-based setups and also uses a Schedule send option.
The steps are not very hard. The real issue is that Outlook versions do not all look the same and do not all work in the same way. Once you understand that part, the rest becomes much easier.
This feature is useful when timing matters, when you want to work early, or when you want your email to arrive at a better moment. It is a small option, but it can make your email routine feel calmer, more planned, and more organized.